Create a Pick-Walk Hierarchy
The best rigs are the ones which are intuitive and simple to use. When building them you must remember that it’s possible it will be used by a whole team of animators, all of which will have their preferred approach to bringing things to life. Overload a rig with too many controls and you’re not only making it more complicated to use but you’re adding to the amount of time it takes an animator to create the simplest of sequences.
One element of rigging which can help is to build in the ability to pick-walk through the hierarchy. This allows the animator to quickly navigate the rig by using the arrow keys, rather than selecting controls or digging through the Outliner. As an example, if you have the hand control selected you can quickly move up the chain to the elbow control, and then the shoulder control and so on. Whereas on a normal rig pressing an arrow key likely selects a constraint node or some other area of the rig which shouldn’t be touched.
The problem is there hasn’t been a good solution to this inside Maya, not without the help of external scripts or tools. Personally, when building rigs for clients I don’t like to add external plugins. It can cause problems down the line when a whole studio then needs to make sure they have the same plugins installed, updated and working just so they can animate.
With the release of Maya 2017 came new controller options giving you the ability to indicate which elements in the scene are controls. With them tagged you can then dictate the pick-walk parent or child regardless of where they lie in the hierarchy.
That’s not all these controller tags do. Once specified that they are part of a rig, Maya will take advantage of any extra CPU or GPU power you have through parallel evaluation, dramatically improving the performance of the scene as it plays back or is interacted with. Something you can test for yourself with the Profiler tool.
What’s more, the controller tags are very simple to setup.
Define Your Controllers
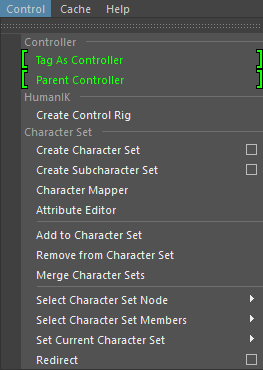
To get started all you need to do is tag your icons as actual Controllers, so Maya knows what they are and can identified when they are being used. To do this simply go to the Control menu under the Rigging menu set. Here you will find two options at the top, these are Tag As Controller and Parent Controller.
You can tag each control individually or you can simply select them all and select Tag As Controller, which is much quicker.
The Controller Node
What this will do is add a new “tag” node to the controller, simply taking the original name and adding “_tag” onto it making them easy to identify and find in the outliner. This is where all the information is stored and it offers a few extra options for you when it comes to dictating how your pick-walking works. You will also notice that there currently isn’t a parent defined for each node, so nothing will happen yet.

Dictate the Hierarchy
With the controllers defined you can now dictate the hierarchy so Maya knows where to go when you use the arrow keys. If we use an arm as an example. First select the hand control and then the elbow and click Parent Controller. Now select the elbow control and then the shoulder and click it again.
You can now use the up and down arrow keys to quickly navigate the arm controls.

Automatically Adjust Visibility
If you have Maya 2018 or newer you will also have the ability to change a controls visibility based on the location of the mouse pointer. This can seem strange to begin with as when loaded, the character will appear to have no controls.
To activate this feature simply go to the tag node and select Show On Mouse Proximity from the Visibility drop down box.

Reposted with permission from 3DWorld magazine